Creating your Menu
The following tutorials will explain how to create and add a menu to your site. We explain in a step by step guide how to create a menu, creating non-clickable menu items, and also using external links.
Video Tutorial
You can create a menu by doing the following:
Step by Step Guide
Step 1 – Create Menu
Once you have added all your content, Go to Appearance > Menus, and then create a new menu. On the left hand side you will see pages, posts and the other items you can add to the menu:
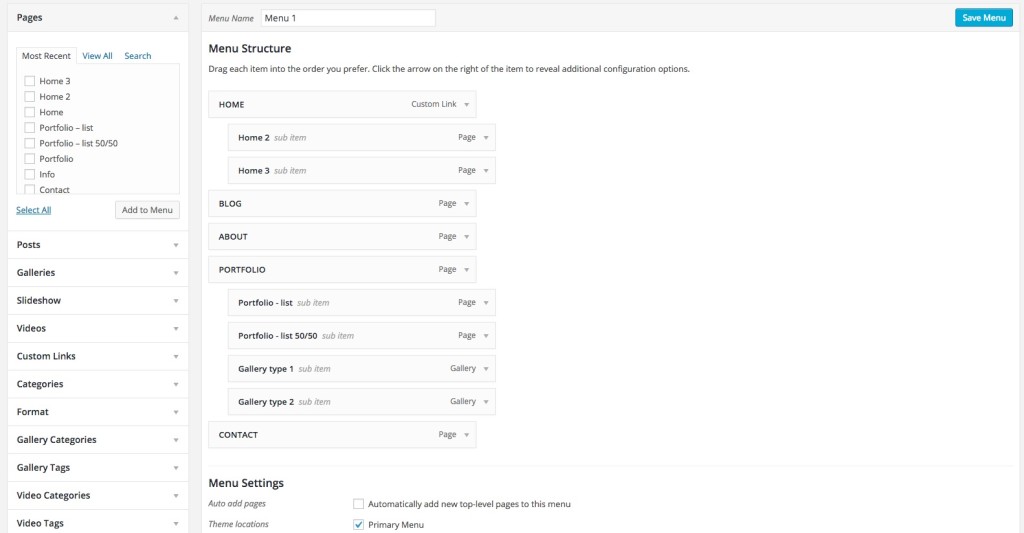
Step 2 – Add Items
You can select any items you want, and then click add to menu.
If you cannot see all the items, scroll to the top right and find screen options, drop down the menu and select any items you may want to add to your menu.
Step 3 – Set as Main Menu
After the menu is created you need to activate that menu as the ‘Main menu’.
NOTE! This is only relevant if it is going to be your main site menu. If creating a custom menu for widget areas and sidebar you can ignore the below.
- Go to Appearance > Menu. Scroll to the bottom of the menu editor window.
- In the section titled Menu Settings > Theme locations, click the check box for the location where you want your menu to appear, Main Menu.
- Click Save menu once you’ve made your selection.

Step 4 – Learn More
You can read more on creating WordPress menu items from the WordPress codex here.
Note! Each time the theme is switched it may be necessary to check this option again if the theme is activated for the first time. Many users are confused why their menu disappears or changes when they switch themes. The solution is simple, just activate one of the menus for the desired location.
External Links
1. Create a Custom Link

2. Open Custom Link Settings
Open up the link settings area and be sure to enable “Open link in a new tab”

3. I don’t have this option
If you do not have the option to open the link in a new tab, expand your Screen Option Settings in the top right corner and enable Link Target.

Add a Single Gallery to Menu
In the following tutorial we explain how to add a single gallery to menu.
First thing to do is to create your gallery. Refer to your theme documentation for this.
Once created, go to Appearance > Menus, and then you will want to go to the main menu.
In here, go to “screen options” it is to the top right, drop the menu down, and then select “galleries”:

Now you’ll have an option to select galleries from the menu items on the left side:
